In my previous post I was a little skeptical if I would get an answer, only to find out I got an awesome one the day after (thank you Joe Kington!).
Here’s his own overview of the answer:
There are essentially two ways to approach the problem, as you noted in your question. I’m actually going to use both in different ways. Use the (temporal and spatial) order of the paw impacts to determine which paw is which. Try to identify the “pawprint” based purely on its shape. Basically, the first method works with the dog’s paws follow the trapezoidal-like pattern shown in Ivo’s question above, but fails whenever the paws don’t follow that pattern. It’s fairly easy to programatically detect when it doesn’t work.
Therefore, we can use the measurements where it did work to build up a training dataset (of ~2000 paw impacts from ~30 different dogs) to recognize which paw is which, and the problem reduces to a supervised classification (With some additional wrinkles... Image recognition is a bit harder than a “normal” supervised classification problem).
His solution uses image recognition to match an impact with one of the four paws. But since I know absolutely nothing about image recognition, I had a hard time understanding how the solution worked. Don’t know what I’m talking about? Here’s the part of the code that failed to make sense to me:
def classify(self, paw):
    """Classifies a (standardized) pawprint based on how close its eigenpaw
    score is to known eigenpaw scores of the paws for each leg. Returns a code
    of "LF", "LH", "RF", or "RH" for the left front, left hind, etc paws."""
    # Subtract the average paw (known a-priori from the training dataset)
    paw -= self.average_paw
    # Project the paw into eigenpaw-space
    scores = np.dot(paw, self.basis_vecs)
    # "whiten" the score so that all dimensions are equally important
    scores /= self.basis_stds
    # Select which template paw is the closest to the given paw...
    diff = self.template_paws - scores
    diff *= diff
    diff = np.sqrt(diff.sum(axis=1))
    # Return the ascii code for the closest template paw.
    return PAW_CODE_LUT[diff.argmin()]
The first part is easy: paw -= self.average_paw is done to extract everything all paws have in common and thus don’t really help discriminating them.
But then we get to the eigenvector part: scores = paw.dot(self.basis_vecs) Oblivious about what eigen vectors really are (I’ve heard about them, but don’t understand what they do), I turned to Wikipedia for an answer:
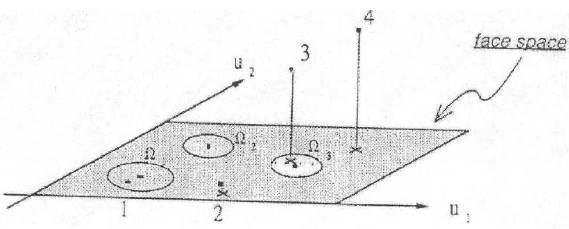
A square matrix represents a linear transformation of the vectors in a vector space.
The mathematical expression of this idea is as follows. If A is a linear transformation, a non-zero vector v is an eigenvector of A if there is a scalar λ such that
The scalar λ is said to be the eigenvalue of A corresponding to v.
An eigenspace of A is the set of all eigenvectors with the same eigenvalue. By convention, the zero vector, while not an eigenvector, is also a member of every eigenspace. For a fixed λ
is an eigenspace of A.


I came for an explanation of what they meant, you know in lay man terms, not to be smacked to death with Mathematical jargon… How does a square matrix represent a linear transformation of the vectors in a vector space? What vectors in what space? Talk English will you! Then they go on about vector v which is an eigenvector if there’s a scalar λ such that Av = λv. Right, what the heck is a scalar and why would that let me substitute A with λ?
Funny enough, I had University level Mathematics for Human Movement Science (or Kinesiology in other parts of the world). However, we only needed the Math for courses like 3D Kinematics, Biomechanics and Data Processing. So the theory part is mostly obfuscated behind walls of more useful calculations that just let me get the job done. But obviously, this doesn’t really help me when I want to learn something new, which actually does require me to understand the theory behind it! Sadly most resources behave like Wikipedia and assume you can actually read formulas and don’t try to explain what they do in normal English.
Naturally I turned to Google and if you search long enough, you’ll probably find what you’re looking for: an entry-level tutorial explaining how Face Recognition works! For anyone like me who doesn’t know too much about Face/Image recognition, this is definitely a recommended reading, if only because the author takes the time to take the reader by the hand to guide him through the theory. Another notable mention goes out to Omid Sakhi and his site facedetection.com, which has a small newsletter-ish course into Face Detection where you get an email every day explaining the theory in bite-size pieces.
Even though I still don’t completely understand what an eigen vector itself is or how it’s being calculated, I have a much better understanding of the whole process in general. I spent a good two days only browsing around for more information and I must admit it got me totally hooked! Even so much that I didn’t even try to get the code working! Which unfortunately turned out to give me an error message. This is especially unfortunate, because it becomes harder to test what all the intermediate results look like. After all, an image is worth a thousand words isn’t it?
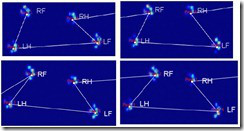
Luckily Joe’s answer is very comprehensive, so I can explain how it works by his words and examples. His first step was to check for the trapezoidal pattern I described in my previous post:
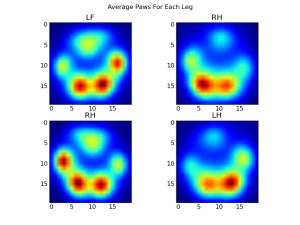
If the impacts follow this pattern, they would automatically get assigned to the paws and from these impacts a training set is assembled. This training set will be used to create an image of what an ‘average’ front left, etc, paw looks like.
To be able to create an average image, we first need to scale each impact to the same size and standardize the values. The end result is pretty consistent:

Before we go any further, we subtract this average paw from each of the separate paws. Now if we look at how each paw differs from the mean, the different paws are clearly distinguishable.
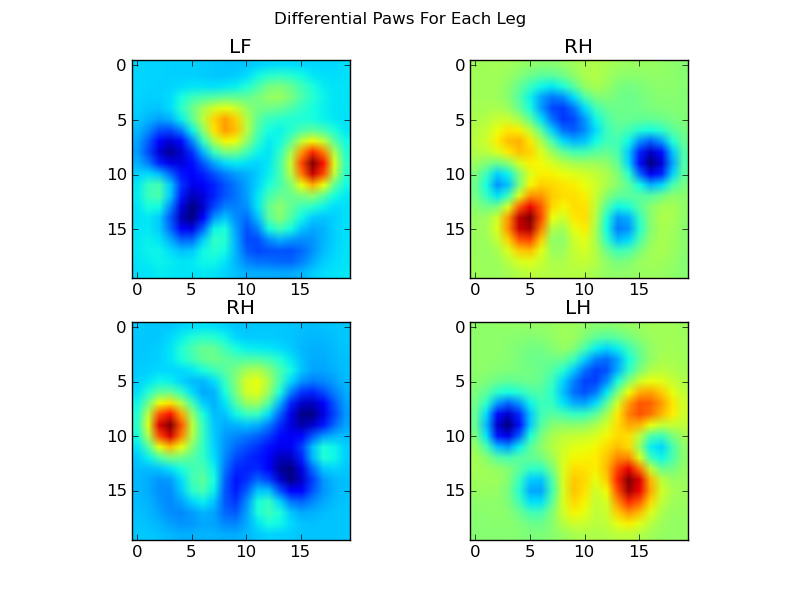
Each impact (20×20 pixels) can be described as a 400-dimensional vector (400×1) and compared to these four. But this doesn’t work consistently, therefore we build a set of ‘eigenpaws’ (which is Joe’s version of eigenfaces) to describe an impact as a combination of eigenpaws.
This is identical to principal components analysis, and basically provides a way to reduce the dimensionality of our data, so that distance is a good measure of shape.
You make them by using this function:
def make_eigenpaws(paw_data):
    """Creates a set of eigenpaws based on paw_data.
    paw_data is a numdata by numdimensions matrix of all of the observations."""
    average_paw = paw_data.mean(axis=0)
    paw_data -= average_paw

    # Determine the eigenvectors of the covariance matrix of the data
    cov = np.cov(paw_data.T)
    eigvals, eigvecs = np.linalg.eig(cov)

    # Sort the eigenvectors by ascending eigenvalue (largest is last)
    eig_idx = np.argsort(eigvals)
    sorted_eigvecs = eigvecs[:,eig_idx]
    sorted_eigvals = eigvals[:,eig_idx]

    # Now choose a cutoff number of eigenvectors to use
    # (50 seems to work well, but it's arbitrary...
    num_basis_vecs = 50
    basis_vecs = sorted_eigvecs[:,-num_basis_vecs:]

    return basis_vecs
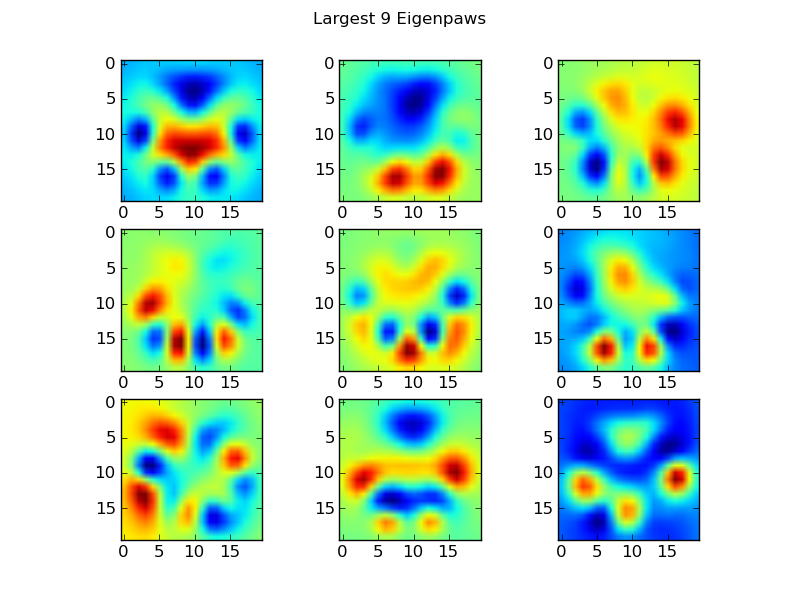
When this is applied to all the data and sort them for size, you get50 eigenpaws (the left image shows the 9 largest). If you would imagine each eigenpaw as a coordinate in a ‘paw space’ and for each paw we can create a cluster in that paw space. So next time we see a new impact, we project it into this paw space and assign it to appropriate cluster of eigenpaws.
This projecting is done by dotting the 400×1 vector with the 50 basis vectors, that way we only have to compare this new 50×1 vector with those template paws from our training set. To classify an impact, we simply use the distance between the vectors with the following code:
# Load template data: codebook, average_paw, basis_stds and basis_vecs
paw_code = {0:'LF', 1:'RH', 2:'RF', 3:'LH'}
def classify(paw):
    paw = paw.flatten()
    paw -= average_paw
    scores = paw.dot(basis_vecs) / basis_stds
    diff = codebook - scores
    diff *= diff
    diff = np.sqrt(diff.sum(axis=1))
    return paw_code[diff.argmin()]
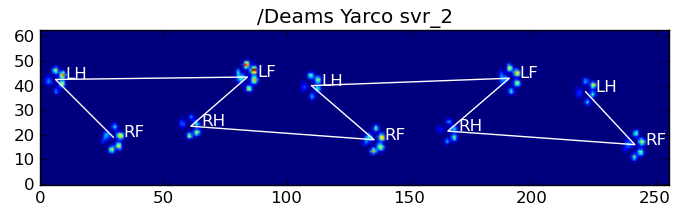
The images’ code is then the one with the smallest difference between the impacts vector and the template vectors of each paw. Et voila:
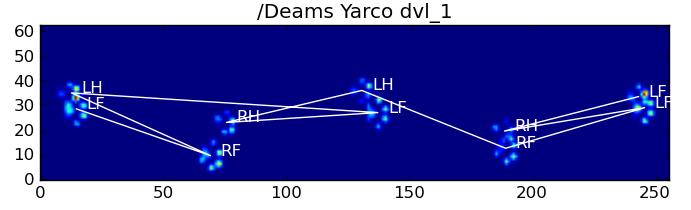
Off course, this isn’t perfect. It doesn’t work so well for the small dogs, because they lack a clear impact and the toes aren’t as nicely separated as with larger dogs. But that’s part of the study: to figure out the limits of the pressure plate, so the clinic knows what they can or can’t measure with it!
Plus Joe and I have been discussing some tweaks, so that it also works in other conditions. Perhaps we need separate training sets for the running and walking trials, based on the walking pattern of the dog or their relative sizes. But to be of much use in these discussions, I clearly have a lot to learn about image recognition!